Have you ever wondered how will a particular user will subscribe to its thing device and not to other’s users IoT device??
Well, think no more we are here to solve this issue.
What are the prerequisites for this task:
- AWS account
- Basic knowledge of AWS IoT Core, and AWS Cognito.
- Cognito UserPool and IdentityPool
Note: This will not work on the already created IoT Thing Device.
Let’s get started.
First, let us start with Cognito.
In Cognito, The user will sign up using a phone number & OTP or email and password. After this, the user is authenticated. During the authentication process, we will use lambda triggers to register a user, verify the user and then attach the specific policy to them. The important thing is that the Cognito user has IoT access and the lambda trigger should have attach principal policy access.
Here is the IAM policy to attach principal policy
{
  "Version": "2012-10-17",
  "Statement": [
    {
      "Sid": "VisualEditor0",
      "Effect": "Allow",
      "Action": "iot:AttachPrincipalPolicy",
      "Resource": "*"
    }
  ]
}
This permission is given to the services via the IAM role. We will talk about the lambda for IoT publish and subscribe to their particular thing device at the end of the blog. When a user gets created, we will trigger a lambda to get the user’s identity id. You will ask what is an identity id? Identity Id is the unique id of a particular user. We need to attach the IoT policy (the one that will subscribe to its own IoT device) to the Identity Id. We will use “attach principal policy” to attach the policy. So whenever a user sign-ups, we will use a lambda trigger to attach an IoT policy to it. This will ensure that the user connects, publish, and subscribe to its own IoT thing device.
After Cognito, let’s go-to IoT Core.
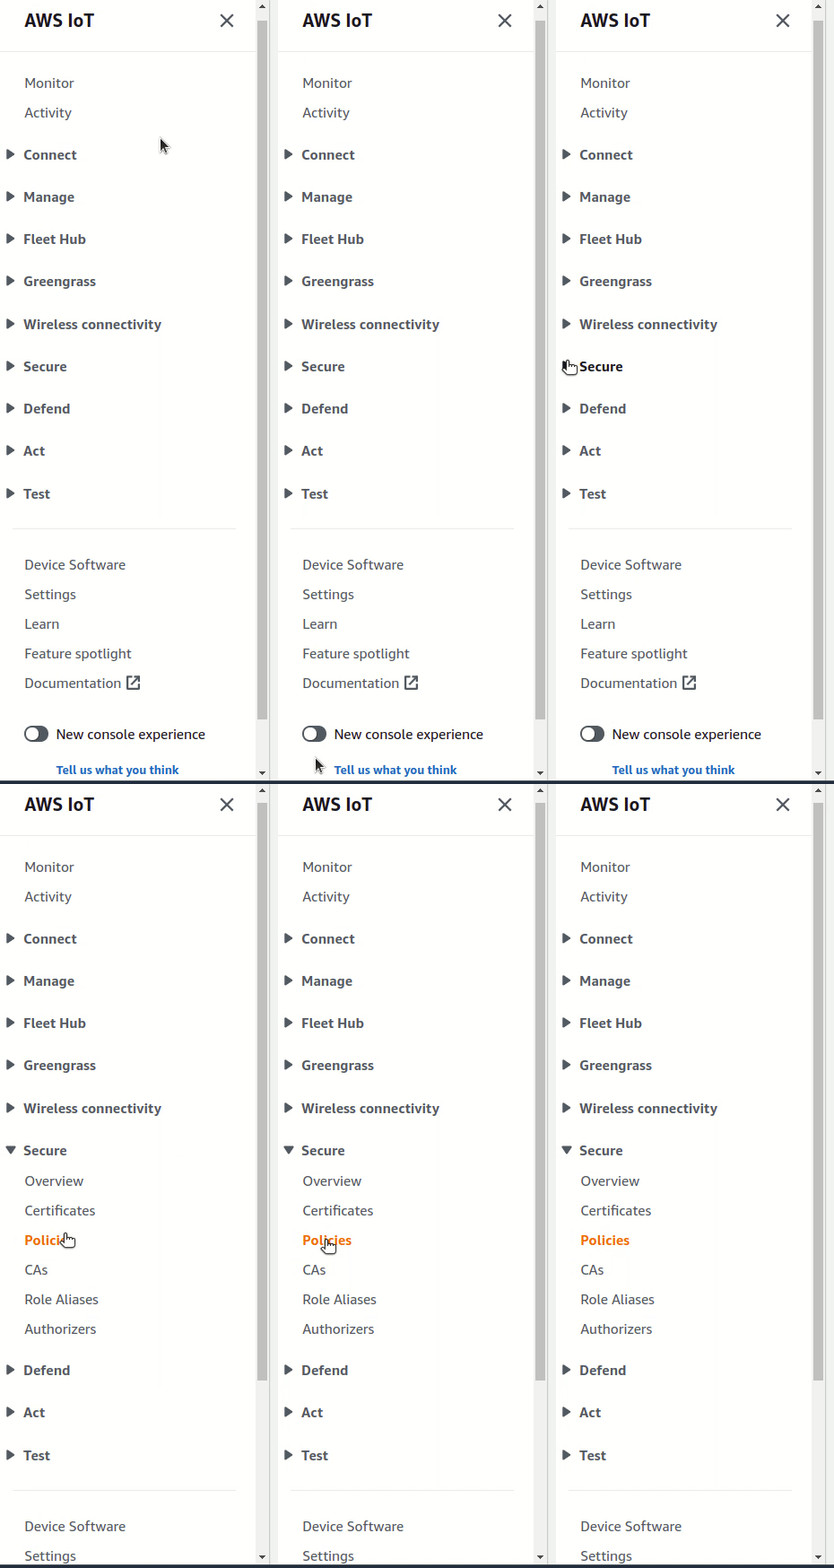
In IoT Core, we need to create an IoT policy. Let us guide you to create an IoT policy that we are going to attach to our thing device.

Create a new policy. Here is the policy we are using.
{
  "Version": "2012-10-17",
  "Statement": [
    {
      "Condition": {
        "Bool": {
          "iot:Connection.Thing.IsAttached": [
            "true"
          ]
        }
      },
      "Effect": "Allow",
      "Action": "iot:Connect",
      "Resource": "arn:aws:iot:us-east-1:awsaccountid:client/${iot:Connection.Thing.ThingName}"
    },
    {
      "Effect": "Allow",
      "Action": [
        "iot:Publish",
        "iot:Receive"
      ],
      "Resource": "arn:aws:iot:us-east-1:awsaccountid:topic/${iot:Connection.Thing.ThingName}/*"
    },
    {
      "Effect": "Allow",
      "Action": "iot:Subscribe",
      "Resource": "arn:aws:iot:us-east-1:awsaccountid:topicfilter/${iot:Connection.Thing.ThingName}/*"
    }
  ]
}
You can change the topic name as per your need. Just make sure that you’re going to mention the ${iot:Connection.Thing.ThingName} in the resource.
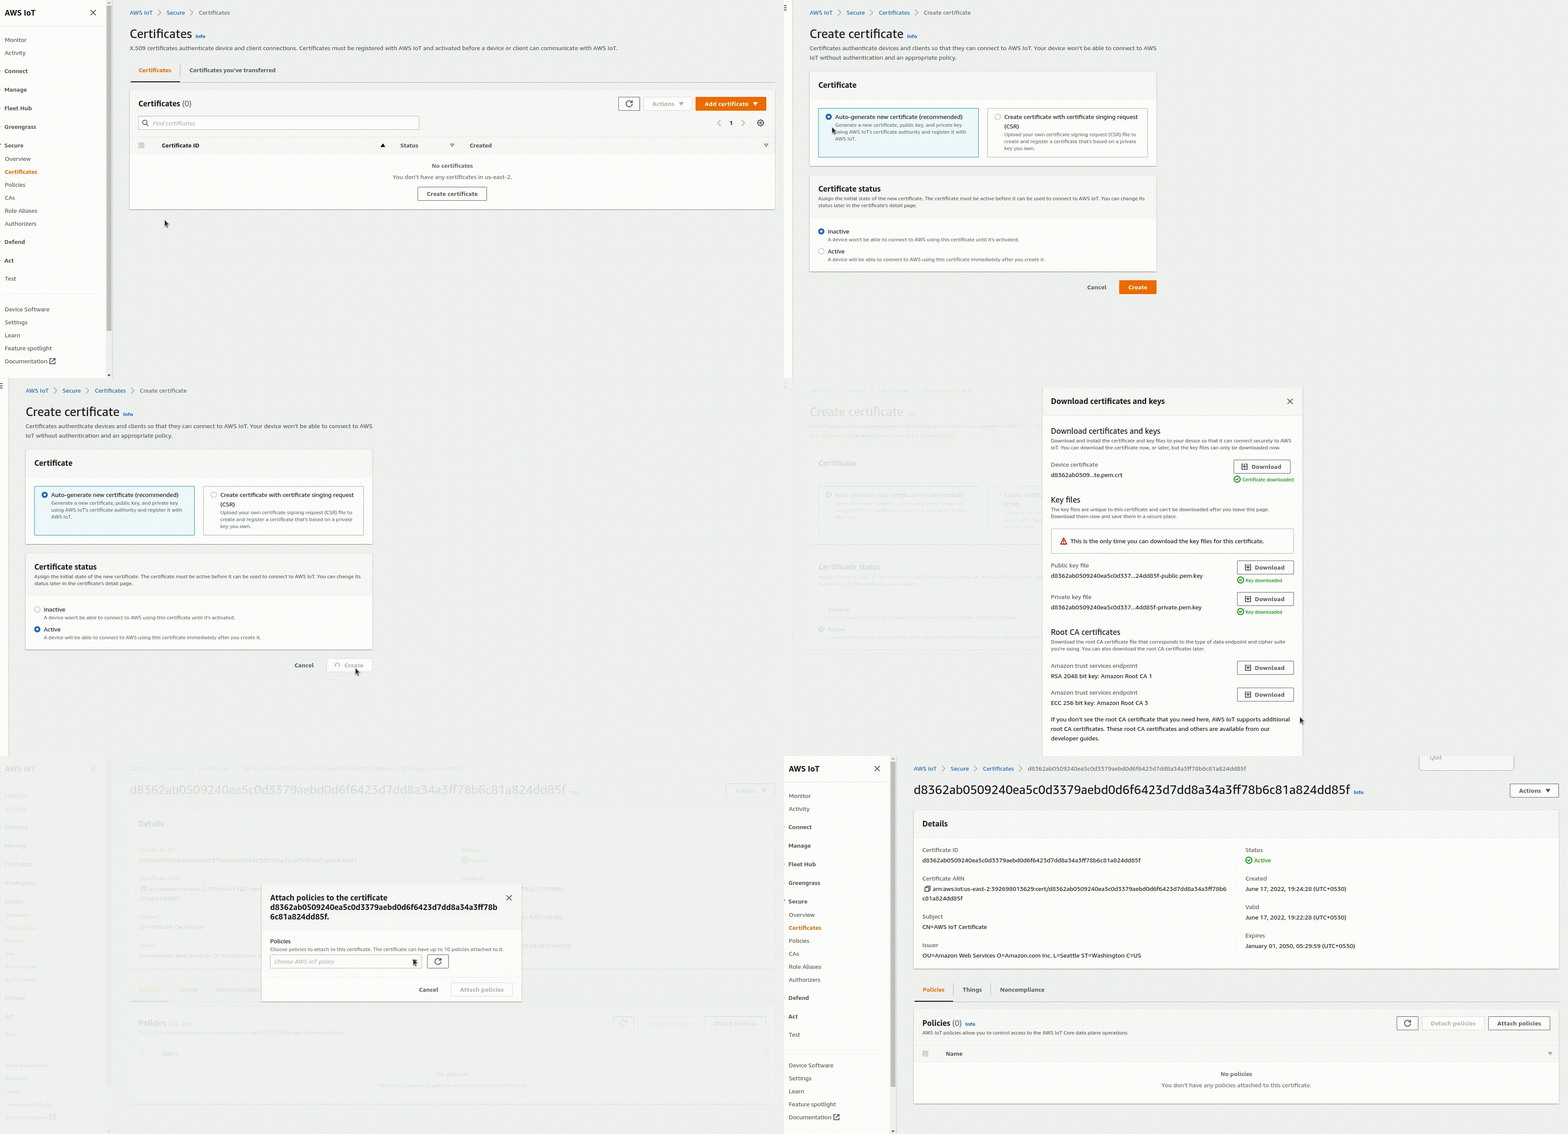
The next step is to create an IoT Certificate. Follow the steps shown in GiF

In this case, we are creating a new IoT certificate. But you can register your own certificate if you already have one. You can auto-generate a new certificate or mention your own certificate signing request. As you can see we are using auto-generate new certificates.
Now whenever we create a new IoT thing device, we are going to register the thing device with our newly created certificate. When we register the IoT device with the certificate, the policy automatically gets attached to the thing device.
When we do an MQTT connection, clientid is required to connect. We need to make sure that the clientid is the same as the thing name.
The final step is to add the code in Lambda
As we discussed above, we use a lambda trigger in Cognito to attach the IoT policy. We will copy this lambda code in our post-confirmation trigger in Cognito.
Here is the code to attach the IoT policy
import * as iot from '../helpers/aws-iot';
import {
    success,
    failure
} from '../helpers/response';

export const generatePolicyDocumentTemplate = (identityId, accountArn) => ({
    Version: '2012-10-17',
    Statement: [
        {
            Effect: 'Allow',
            Action: [
                'iot:Publish',
            ],
            Resource: [
                `arn:aws:iot:${process.env.AWS_REGION}:${accountArn}:topic/room/public/*/${identityId}`,
            ],
        },
    ],
});

/**
* Attach a policy to the Cognito Identity to allow it to publish to any public room
* The client can only publish to their unique topic that ends with their Cognito Identity Id:
* /room/public/+/${identity}.
* This is so that when receiving a message, another client can parse the mqtt message topic to
* determine who sent the message
*/

export const main = async (event, context, callback) => {
    const cognitoIdentity = event.requestContext.identity.cognitoIdentityId;

    // Policy Name regex does not support ':'. Replace with '-'.

    const policyName = `IotChatPublicPublishPolicy.${cognitoIdentity.split(':').join('-')}`;
    const principal = cognitoIdentity;
    const accountArn = context.invokedFunctionArn.split(':')[4];
    const policyDocument = generatePolicyDocumentTemplate(principal, accountArn);

    try {
        await iot.createPolicy(JSON.stringify(policyDocument), policyName);
        await iot.attachPrincipalPolicy(policyName, principal);
        callback(null, success({
            status: true
        }));
    } catch (e) {
        if (e.statusCode === 409) {
            // Policy already exists for this cognito identity
            callback(null, success({
                status: true
            }));
        } else {
            console.log(e);
            callback(null, failure({
                status: false,
                error: e
            }));
        }
    }
};
If you follow these steps, users can connect to their own IoT thing devices and restrict anyone from connecting to their IoT thing device.
That’s all folks!!
